Introduction to the Windows 11 Eraser Tool
Editing screenshots just got easier with the Windows 11 Photos App Eraser Tool. Whether you want to remove distracting UI elements, background clutter, or unwanted objects from your images, this free and powerful built-in feature makes it simple. In this guide, we’ll walk you through a step-by-step process to achieve clean, professional-looking images using this tool, ensuring your screenshots are polished and distraction-free.
Why Use the Windows 11 Eraser Tool?
The Eraser Tool in the Windows 11 Photos App is a game-changer for quick edits. It’s user-friendly, requires no additional software, and leverages intelligent blending to seamlessly remove objects while preserving the background. Perfect for beginners and pros alike, this tool saves time and delivers impressive results.
Quick Overview: How It Works
Here’s a simplified one-line flowchart to understand the process:
Open Image in Photos → Tap Edit → Use Eraser Tool to Remove Unwanted Parts
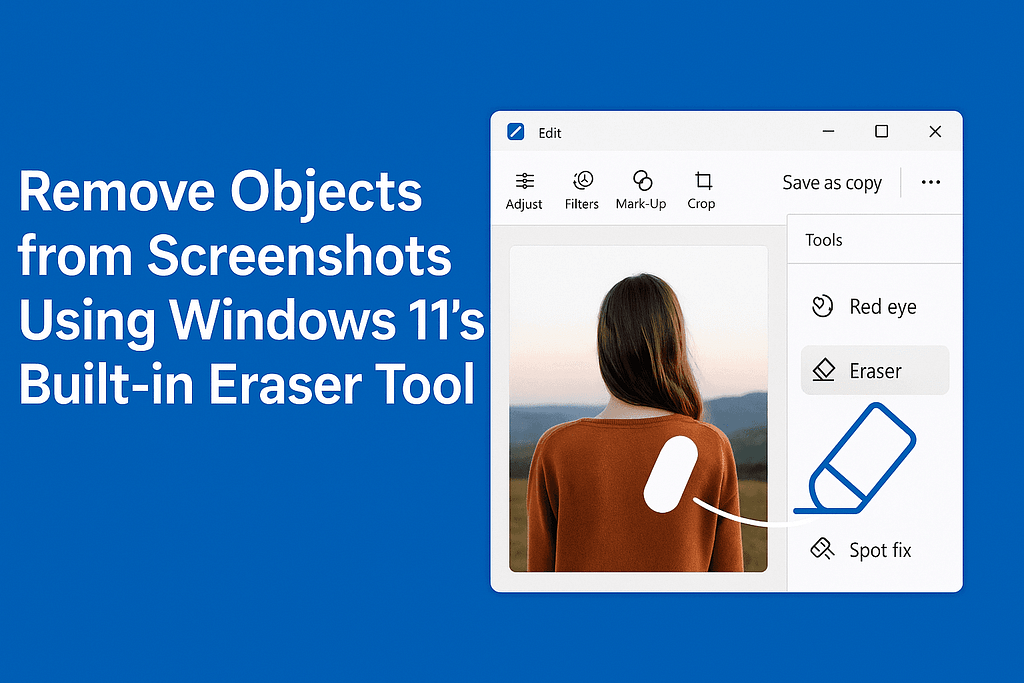
Step-by-Step Guide to Remove Objects from Screenshots
Follow these easy steps to erase unwanted elements from your screenshots or images using the Windows 11 Photos App.
Step 1: Open the Image in Windows 11 Photos App
Start by locating the screenshot or image you want to edit. Right-click the file, select Open with, and choose Photos from the menu. This opens your image in the Windows 11 Photos App, ready for editing.
Step 2: Enter Edit Mode
Once the image is open, look at the top toolbar. Click the Edit Image button (it may appear as a pencil icon). This will take you to the editing interface where you can access various tools, including the Eraser.
Step 3: Use the Eraser Tool
In the editing interface, locate the Eraser option in the right panel. Select it, and your cursor will turn into a brush. Simply brush over the part of the image you want to remove. The Eraser Tool uses intelligent algorithms to blend the surrounding background, making the edit look natural.
- Tip: For larger objects, brush slowly to ensure accuracy.
- Note: The tool works best on areas with consistent backgrounds, like skies or plain surfaces.
Step 4: Fine-Tune Your Edit (Optional)
For more precise edits, use the zoom function to focus on smaller objects or edges. You can also adjust the brush size in the Eraser Tool settings to target specific areas more accurately. This is especially helpful for intricate details or complex backg rounds.
Step 5: Save Your Edited Image
Once you’re satisfied with the edit, click Save a Copy to preserve the original image while saving the edited version. You can also overwrite the original if preferred, but saving a copy is safer.
Tips for Best Results with the Eraser Tool
- Use a consistent background: The Eraser Tool works best when the area around the object has a uniform color or pattern.
- Practice with brush size: Smaller brushes are ideal for detailed work, while larger brushes cover bigger areas quickly.
- Undo if needed: Made a mistake? Use the undo button to revert changes instantly.
- Test on a copy: Always work on a duplicate image to avoid losing the original.
Why This Tool is Perfect for Your Editing Needs
The Windows 11 Photos App Eraser Tool eliminates the need for expensive software like Photoshop for basic object removal. It’s built into Windows 11, so there’s no cost, and its intuitive interface makes it accessible to everyone. Whether you’re cleaning up screenshots for a presentation, blog, or social media post, this tool delivers professional results with minimal effort.
Ready to start? Open the Photos App on your Windows 11 device and begin editing your screenshots now!
Share this guide: Help others learn how to remove objects from screenshots with the Windows 11 Eraser Tool!
Have questions or tips? Leave a comment below!